Constant Buffer Performance
When constant buffers were introduced in DirectX 10 changing shader constants became a whole lot more tricky. Updating constant buffers in a inefficient manor can have a massive performance loss in your application.
According to NVidia 80% of all command buffer traffic sent to the GPU was shader constant data for games running DirectX 9. Constant buffers were introduced to reduce this amount of data. Game engines were supposed to turn the necessary constant changes into updates of a few small constant buffers. Updating these in a inefficient manor however can cause severe bottlenecks.
This article will compare the different techniques of updating constant buffers in DirectX 12. Please note that different hardware or different drivers might have a impact on the difference between techniques.
Constant Buffer Basics
Constant buffer allow you to keep track of the shader constants and only change them when necessary. This wasn’t possible before DirectX 10.
A constant buffer can be bound to any number of pipelines at the same time. This means in theory there would be no reason to have a shader constant stored twice. Unfortunately binding the same constant buffer to several shader stages will make updates more expensive.
Constant Buffer Updates and Renaming
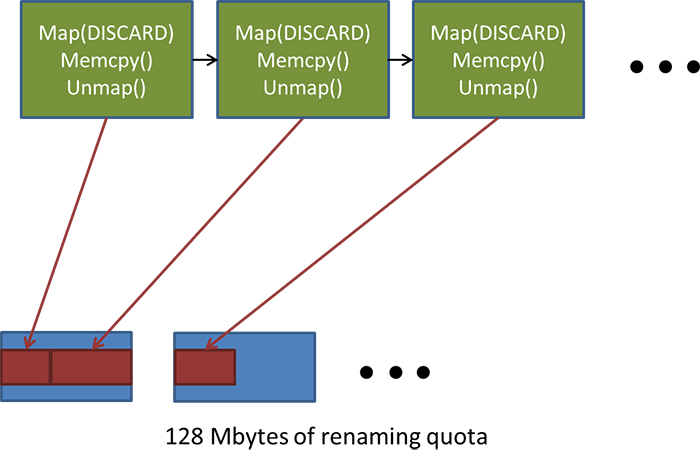
If you change the contents of a constant buffer, usually the old data is still needed by the GPU. To avoid stalling, the graphics driver returns a pointer to a different block of memory for each pair of calls to ID3D12Resource::Map or UpdateSubresources (Previously ID3D11DeviceContext::UpdateSubresource). This process is called Renaming.
The driver reserves a small amount of memory (currently 128MB for NVidia drivers) for renaming. If the accumulated memory size is greater than the reserved amount of memory the graphics driver will throttle the application until it has recovered. This throttling event should be avoided.
 {#id .class height=300px}
If we would update 4096 bytes of constant buffer data (2048 for the pixel stage and the vertex stage) for 10000 draw calls per frame. The graphics driver would use ~156MB of the reserved memory causing throttling (This assumes quadruple buffering).
Different Updating Techniques
Technique 1
Updating for every single object a constant buffer before rendering the frame. Calling Map and Unamp every update.
Call order:
- Map.
- Copy data.
- Unmap.
- if there are more objects return to 1.
- Bind constant buffer view.
- render object.
- if there are more objects return to 5.
Technique 2
Updating for every single object a constant buffer before rendering the frame. Calling Map and Unmap during initialization and deinitialization Quickly subjectable to running out of reserved renaming memory.
Call order:
- Copy data. (using the already mapped address)
- if there are more objects return to 1.
- Bind constant buffer view.
- render object.
- if there are more objects return to 3.
Technique 3
Using 1 massive buffer which is update for every object separately. Mapped at the beginning of the frame (and unmapped when done updating).
Call order:
- Map massive buffer.
- Copy data.
- Unmap massive buffer.
- if there are more objects return to 1.
- Bind constant buffer view.
- render object.
- if there are more objects return to 5.
Technique 4
Using 1 massive buffer which is update for every object separately. Mapped during initialization and unmapped during deinitialization.
Call order:
- Copy data. (using the already mapped address of the massive buffer)
- if there are more objects return to 1.
- Bind constant buffer view to the massive buffer.
- render object.
- if there are more objects return to 4.
Technique 5 / 6
Same as 3 and 4 but instead of copying the data per object we copy the data all at once into the massive buffer.
Call order (omitting mapping and unmapping):
- Copy data.
- Bind constant buffer view.
- render object.
- if there are more objects return to 5.
Technique 7 / 8
Similar to 1 and 2. But instead of updating everything before rendering we update the constant buffers in between draw calls.
Call order (omitting mapping and unmapping):
- Copy data.
- Bind constant buffer view to the massive buffer.
- render object.
- if there are more objects return to 1.
Technique 9
Instead of mapping, unmapping and using memcpy, this technique would use UpdateSubresources. To do this you would need a default and upload heap and copy between those. This is not viable when changing a buffer every frame so I won’t benchmark this.
Benchmark Results
Please note that the actual values don’t matter. The relative cost is what is important.
Hardware Specifications:
-
Intel(R) Core(TM) i7-4790k CPU @ 4.00GHz
-
12.0 GB DDR3 1.333Mhz Ram
-
NVIDIA Geforce GTX 970

The code I am benchmarking can be found here
Conclusion
Technique 1 vs 2
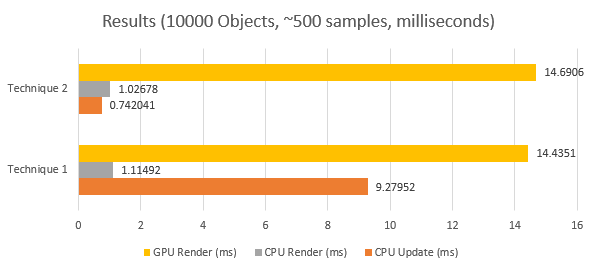
If we compare at the CPU Update (ms) bar’s we can see the cost of mapping and unmapping. This is quite an expensive operation as you can see and should be avoided if possible. Keep in mind to not exceed the reserved renaming memory.
The GPU and CPU render timings are within the error margin so we can’t deduce anything from that.
In a small game you should consider mapping and unmapping at the beginning of a scene or creation of the relevant object.
Technique 2 vs 4
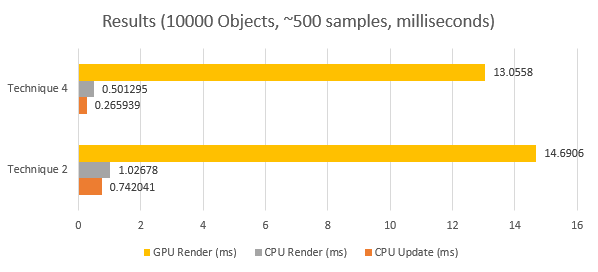
Lets compare both the CPU Update (ms) and CPU Render (ms) bar’s. We can see a quite noticeable performance increase for both the render and update timings when using technique 4. This is not very surprising since we are modifying less objects and the render function suffers less cache misses.
When comparing the GPU timings we can again see a big performance difference. This again is most likely due to the smaller amount of cache misses but this time on the GPU.
Technique 4 vs 6
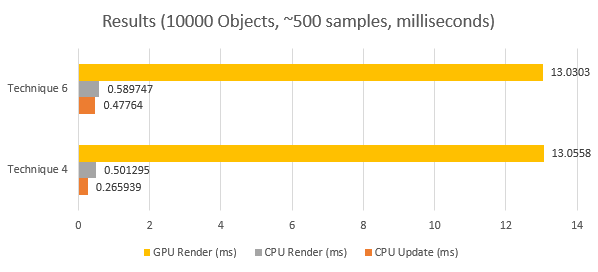
The CPU and GPU timings are again within the error margin so lets skip those. The CPU update function however took slightly longer than technique 6. I have no idea why this is.
Even if technique 6 was faster than 4 in practice we probably would still see a performance decrease. To update the constant buffer in one call we first need to gather all the data. Depending on how the data is stored and gathered this can be very expensive and in my tests this was way to slow to be useful. But if you could write your application so that their would be no need to gather the data at once it might be faster IF technique 6 was faster than 4.
Technique 4 vs 8
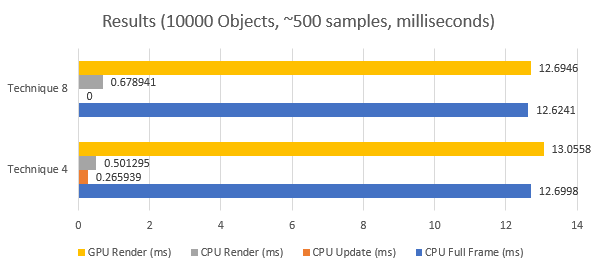
Now since we are not using the update function for technique 8 we need to add the CPU update and render time to each other and compare that value to the CPU render timings of technique 8.
So technique 4 took 0.767234 ms and technique 8 0.678941. These values are really close to the error margin but we can assume that technique 8 is faster because it removes 1 for loop completely and is less subject able to cache misses.
Conclusion
Technique 8 is the fastest and should be quite easy to implement for most renderer architectures.